Add a floor plan and a minimap to a tour
Upload a floor plan, pin each scene on it, calibrate the radar, and set up the Floorplan Minimap that visitors see. File types, limits and what to check.
Guide6 min read Updated
On this page
The short answer
On the Floor Plans tab (in the Advanced view), click Upload Floor Plan and choose a PNG or JPEG file of up to 5 MB. Click the plan where each scene was shot, choose the scene for each pin, then use Calibrate Radar so the cone on the map points the way the camera faces. Visitors see the plan as a small map in a corner of the tour. It is set up under Floorplan Minimap on the Design tab (in the Advanced view) and is on by default.
Who can do it
- The owner, and collaborators whose role includes the Floor Plans tab (Editors and Admins, by default). Calibrate Radar saves through the panorama, so it also needs the Panoramrs tab. The map's look is on the Design tab (Admins, by default).
- No plan is needed to upload plans and pin scenes. The map's look is part of a theme: a tour in a Pro theme that has never been hosted, on a Free plan, shows the free Default look on its public page, with the map on at the top right, whatever you set. A tour in a free theme, the Default Theme, shows the map as you set it.
- Panoramr does not draw a plan for you or take SVG files. A tour can have one plan for each floor; a trial tour can have 3.
Upload a plan
- Open the tour's Floor Plans tab (click Advanced at the right end of the tab row first if the tab is not there) and click Upload Floor Plan.
- Choose a PNG or JPEG file of up to 5 MB. While it uploads, the page reads
Uploading map.... The plan joins the list asFloor Plan 1, thenFloor Plan 2, and so on, with a count such as0 pinned hotspots.
The pencil (Rename Floor Plan) renames a plan. Its name shows in the player when the tour has several plans. The trash icon (Delete Floor Plan) asks Are you sure you want to delete this floor plan? and moves the plan to Trash (Deleted Assets) on the Assets tab, where only the tour's owner can restore it (details).
Pin the scenes
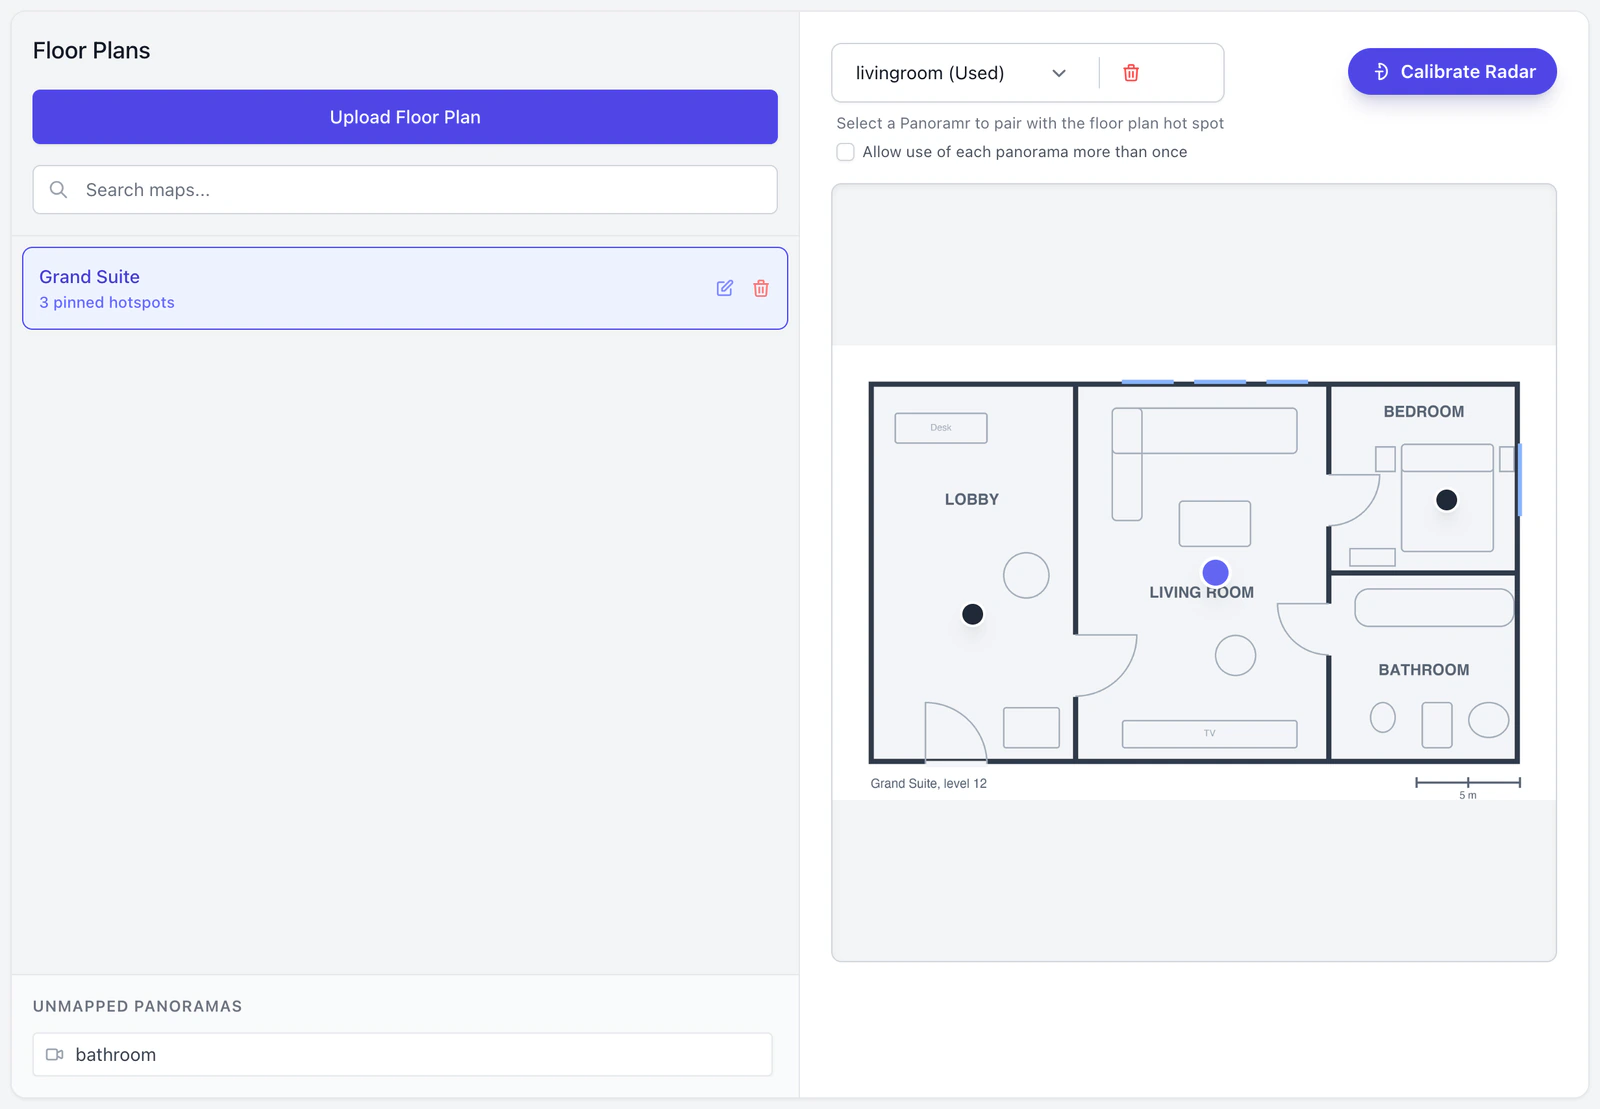
- Click a plan in the list. Until you click a pin, the page reads
Click on the floor plan to add a hotspot. - Click the plan where a scene was shot. A round pin (the editor also calls it a hotspot) appears, and a list reads
-- Select Panorama --. - Choose the scene. Scenes already pinned sit under Already Used and cannot be chosen again, unless you tick Allow use of each panorama more than once.
- Repeat for each scene. Drag a pin to move it. Click a pin to select it, and use the trash icon (
Delete Pin) to remove it.
Every change is saved at once, and there is no Save button. Each click on an empty part of the plan adds a pin, so click a pin to select it. Unmapped Panoramas lists the scenes with no pin. Visitors do not see a pin that has no scene.
Calibrate the radar
The radar is the cone that turns on the pin of the scene a visitor is in. Each scene is calibrated on its own.
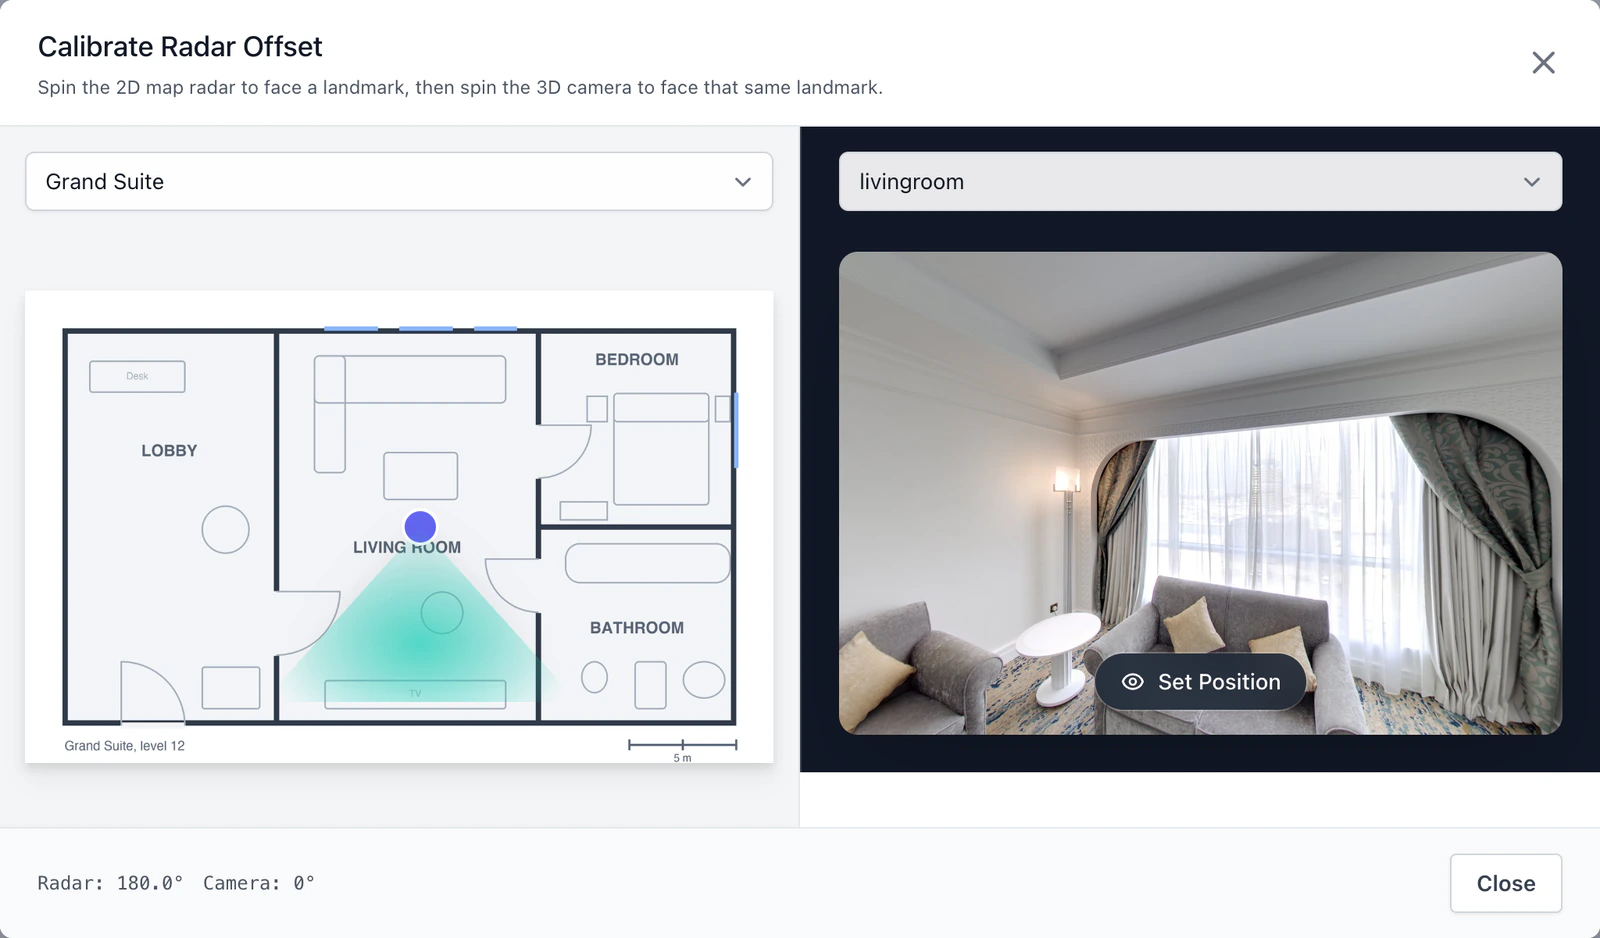
- Click the scene's pin, then click Calibrate Radar at the top right of the plan.
- In the Calibrate Radar Offset window, pick a landmark you can find on the plan and in the picture, such as a window.
- Drag the teal cone on the plan until it points at the landmark. The picture on the right turns with it.
- Drag the picture until the same landmark is in its middle.
- Click Set Position. It reads
Position Saved. Choose the next scene from the list above the picture.
Set Position saves two things. The panorama's heading is saved on the panorama itself, so another tour that uses it gets the heading too. And this tour's starting direction for the scene becomes the direction the camera faces, with the saved tilt and zoom removed: see Set the starting view.
Set up the map for visitors
On the Design tab, open Floorplan Minimap. The map shows as soon as the tour has a plan. Visitors click a pin to go to its scene, and the pin of the scene they are in carries the radar. With several plans, a list switches between them, and the map follows visitors to the plan that holds their scene.
| Option | What it does | Default |
|---|---|---|
| Enable Minimap Interface | Shows the floating map | On |
| Screen Position | Bottom Left, Bottom Right, Top Left or Top Right | Top Right |
| Initial State (Advanced) | Starts expanded, or collapsed to a small Map button |
Expanded |
| Allow Corner Resizing (Advanced) | Visitors drag a corner to resize it | On |
| Show in Side Nav - List Menu (Advanced) | Adds a button to the Side Nav - List Menu side menu, when that is on, which opens the plan. Shown only while Enable Minimap Interface is on: to have the plan only in the side menu, switch it on here first, then switch Enable Minimap Interface off | Off |
The Advanced options show only after you click Advanced. Floorplan Toggle in Top Nav Bar - Dropdown (off by default) and Floorplan Model in Icon Bar add buttons that open the plan in a window. On windows 768 px wide or narrower, such as phones, the corner map and the top bar's button are hidden. There, Floorplan Button in Mobile Navigation (an Advanced panel, on in the bottom bar by default) opens the plan. Click Save & Render to save.
Does it reach visitors?
Nothing on the Floor Plans tab refreshes the stored copy of the tour that visitors get: not uploading, renaming or deleting a plan, and not placing or moving a pin. Set Position and Save & Render do, unless the tour has Draft Workflows on. To publish plan changes, see My changes do not show for visitors.
Troubleshooting
The upload is refused. Red text under the search box says why: The image field must be a file of type: jpeg, png, jpg. or The image field must not be greater than 5120 kilobytes.
Visitors do not see the plan. Check, in order: the stored copy was refreshed after you uploaded or pinned; Enable Minimap Interface is on; the window is wider than 768 px, or a floorplan button is on.
A pin does nothing when a visitor clicks it. Its scene is not in the published tour, because it lies beyond the limit on published scenes. See Why can't I publish my tour?.
The cone points the wrong way. Calibrate that scene again and wait for Position Saved.
Next steps
Was this article helpful?