Limit how far visitors can look up or down
Set Limit View Upward and Downward on the Design tab, with Initial Global Zoom and Lock Maximum Zoom, and what the limits do and do not hide, such as a tripod.
Guide5 min read Updated
On this page
The short answer
On the Design tab, click Advanced, open Global Aesthetics, set Limit View Upward (Pitch) and Limit View Downward (Pitch), and click Save & Render. The limits stop how far the camera can tilt, in every scene of the tour at once. They do not crop the picture, so a limit on its own does not hide what lies below it, such as a tripod.
Who can do it
- The owner, and a collaborator whose role includes the Design tab (Admins, by default). Saving also needs the Settings tab in the role.
- The limits are saved with the tour, not with a theme, so the public page and an embed show them on every plan, in any theme. A free download is the Standard design, which has no limits; a download of your own design, which comes with a paid plan, has them. They show in the editor, the preview beside the panels and the Preview tab. See what the free account gives.
Set the limits
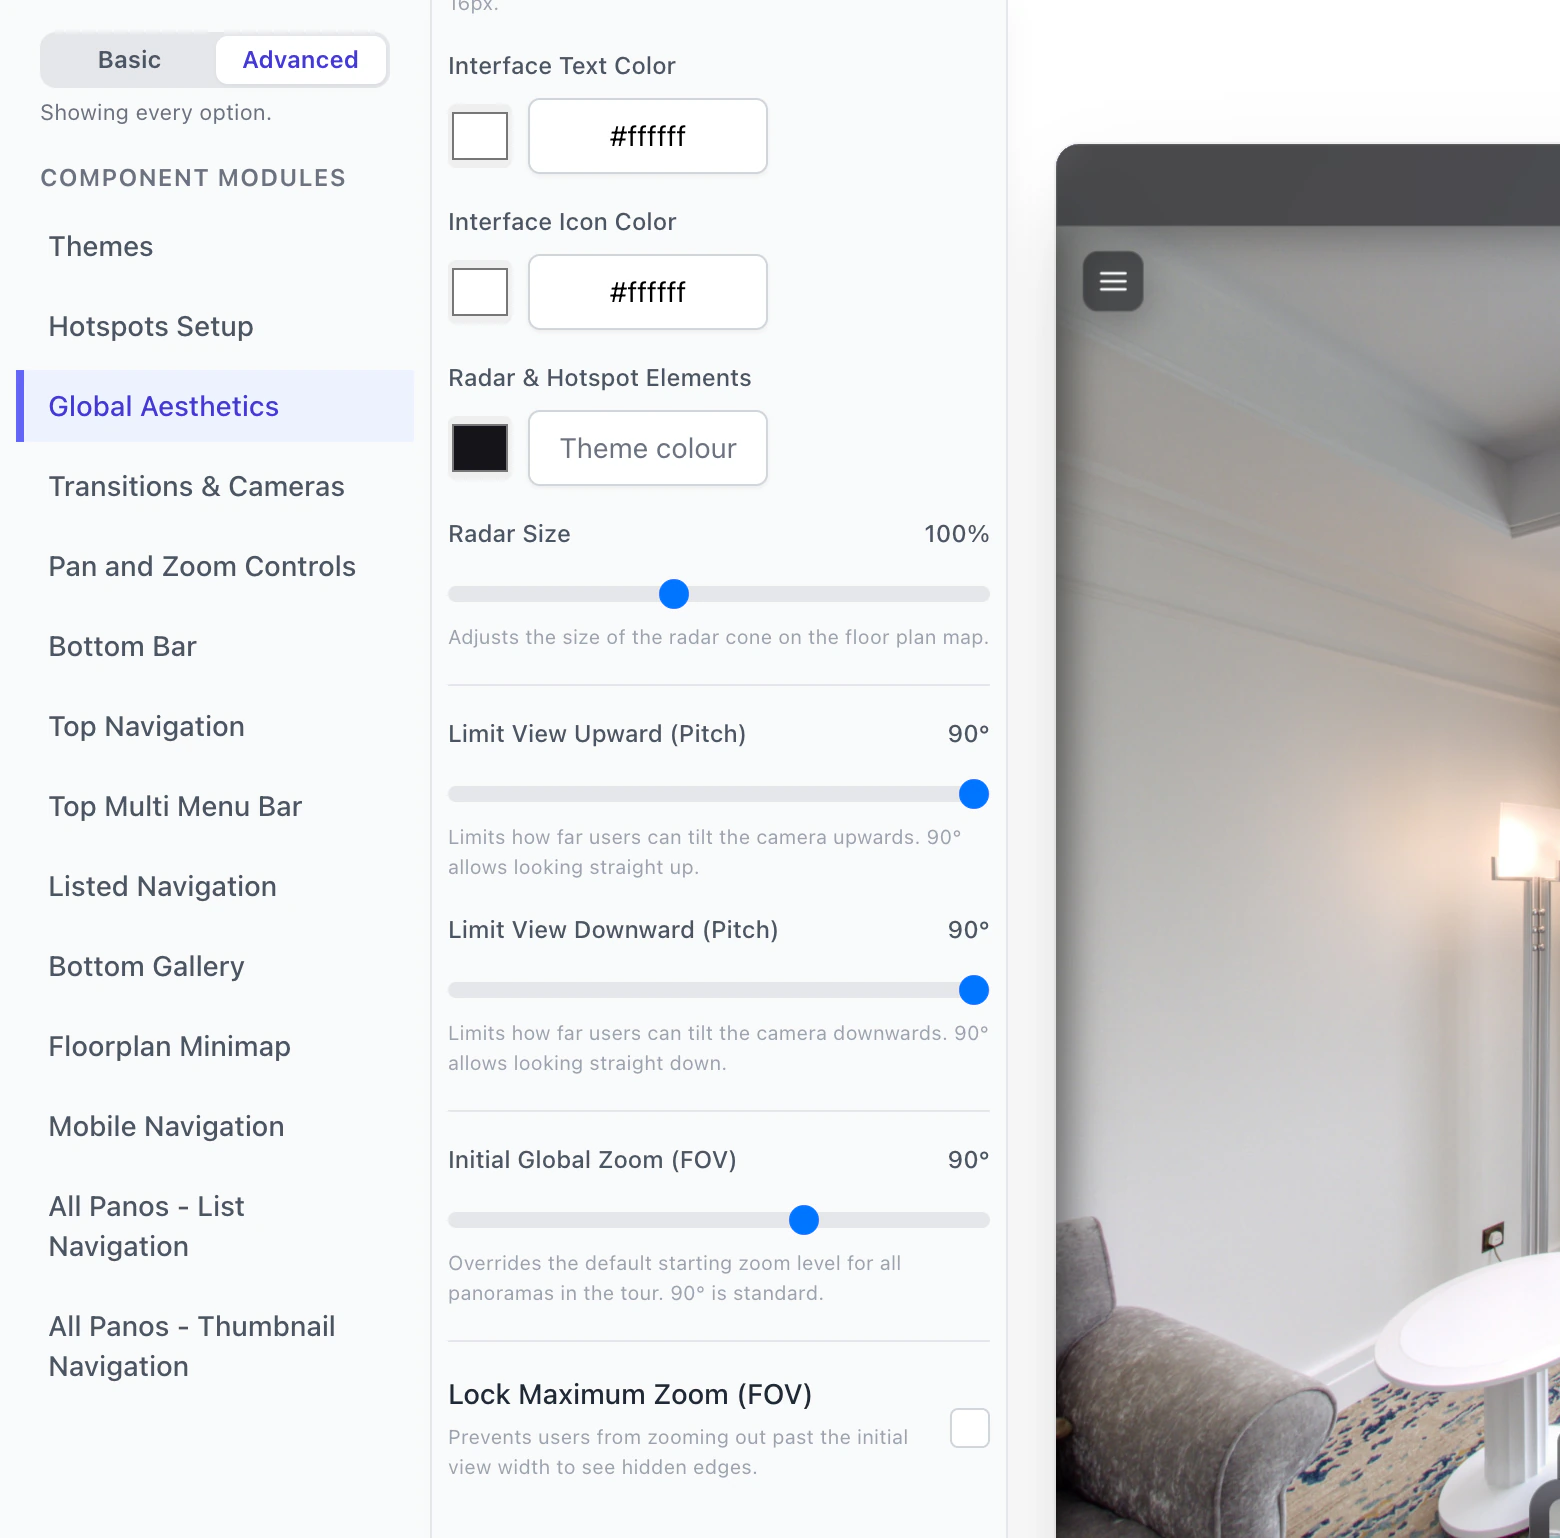
- Open the Design tab.
- Click Advanced at the right end of the tab row. In Basic mode these controls are hidden (
Showing the essentials. Switch to Advanced for every option.). The browser remembers your choice. - Click Global Aesthetics and scroll to the sliders.
- Drag Limit View Upward (Pitch) and Limit View Downward (Pitch). Each runs from 0° to 90°. 90°, the default, allows looking straight up or down. 0° stops the camera at the horizon in that direction.
- Optional: Initial Global Zoom (FOV) sets how much of a scene fits in the window when it opens, from 30° to 120°. The default is 90°, and a lower number zooms in. Tick Lock Maximum Zoom (FOV) to stop visitors from zooming out past that opening view.
- Click Save & Render.
The preview beside the panels is the real player. It shows your changes a moment after you make them (Updating…, then Preview is live), before you save. The Preview tab shows what is saved.
What a limit does
A limit stops the middle of the view from tilting past it. The window shows more than the middle: its top and bottom edges sit half the view's height beyond it. So the lowest point a visitor can see is the downward limit plus half the height of the view.
For a view 90° tall (a phone held upright, at the default zoom):
| Downward limit | Lowest point visible, measured down from the horizon | Patch under the camera that stays hidden |
|---|---|---|
| 90° (default) | All the way down | None |
| 45° | 90°, straight down | None |
| 35° | 80° | 10° around the point straight down |
| 30° | 75° | 15° around it |
| 20° | 65° | 25° around it |
A limit of 45° to 60° hides nothing in a view this tall, so it does not keep a tripod out of sight. To keep a patch of radius R out of view, set the downward limit to at most 90° minus R minus half the view's height. The upward limit works the same way for the ceiling.
The view is shorter in a wide window than in a tall one. With the default zoom and Lock Maximum Zoom (FOV) ticked, a 4:3 desktop window opens about 90° wide and 74° tall, so a limit of 35° hides a patch of about 18° there. Without the lock, visitors can zoom out, which shows more of the floor.
To keep the floor under the camera out of sight, lower the downward limit, tick Lock Maximum Zoom (FOV), and test. In the Preview tab use the icon buttons with the tooltips Mobile View and Desktop View, drag the picture down as far as it goes, and zoom out.
Panoramr also draws a round graphic at the straight-down point of each scene. On a tour that is hosted without Panoramr's branding (in a Vault that is running, or in your plan's hosting), Hide Tripod Cap (Nadir Patch) on the Publish tab, in the Overview pane, removes it. On a tour that is not hosted, the graphic shows whatever you tick, except on its own Explore page, where ticking the box hides it. See Hide the tripod.
Where else the limits apply
- After you save them, the pictures on the Panoramrs and Hotspots tabs stop at the limits too. Raise them to work on the floor or ceiling, then lower them again.
- A starting view saved beyond a limit is brought back inside it when the scene opens: see Set the starting view.
- Save & Render refreshes the stored copy of the tour that visitors get, unless the tour has Draft Workflows on: then nothing reaches them until you click Publish Changes. See My changes do not show for visitors.
Troubleshooting
I cannot find the limit sliders. The Design tab is in Basic mode. Click Advanced, then open Global Aesthetics.
The tripod still shows. The limit is too high for the window: see the table above. Lower Limit View Downward (Pitch), tick Lock Maximum Zoom (FOV), and test at Mobile View as well as Desktop View.
My limits work in the preview but not on the public page. The stored copy has not been refreshed since you saved: see My changes do not show for visitors. A free download is the Standard design, which has none.
I cannot tilt as far on the Hotspots tab since I saved the limits. The pictures in the editor follow the saved limits. Raise them, work, and lower them again.
Saving is refused. The role has the Design tab but not the Settings tab. Ask the owner to change it under Client Workspaces in My Account.
Next steps
Was this article helpful?